
Installing The Burner In Your Oven
Hello. This page provides information on installing the burner into your new Forno Classico oven. Installation of the burner needs to be done by a licensed professional. Improper installation can increase the risk of fire, and serious injury or death.
When you receive the oven, the burner will be in a separate box located inside the oven. At one end of the burner assembly is the control knob, and at the other end is the stainless steel burner. It is essential to use the installation template to help with burner installation. It is important that the oven be placed in it’s permanent location prior to installing the burner.
The burner is installed from underneath the oven using the four screws. This secures the burner assembly to the oven itself. The next step is to attach the control knob to the countertop using the enclosed mounting bracket. The flexible gas line allows for a certain amount of leeway in selecting your control knob location. It is important not to pull or bend the flexible gas line as it could cause a gas leak and fire hazard.
After the installation is complete, the installer should check all fittings and connections to ensure there are no gas leaks. The oven should not be lit until after all safety checks and installation is complete.
The information here is to help you install the burner in your new oven for a countertop installation. Please see our other pages for information on installing the burner if you use an oven stand from Forno Classico.
Before installing your oven, you will need to prepare the countertop where you will place it. Each oven has its installation information in a .pdf file. It is essential to use the correct information for your specific oven.
Below you will find links to the .pdf “Oven Installation” information for our various ovens. The burner assembly is comprised of three separate sections. They are the burner, the gas line flex hose, and the controller.
The flex hose is long enough to allow the controller to be installed on either the left or right side at the front of the oven.
The burner for your oven will be in the same crate as your oven. It is usually inside the oven and marked as the oven burner assembly. The burner assembly comes preassembled and is approximately 55″ in length including the flex hose.
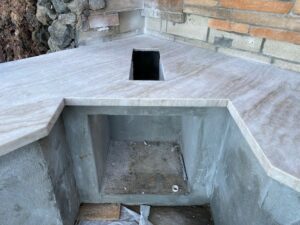
To install the burner assembly for use with the oven on your counter, you will need an opening from the top of the counter completely through its supporting base. This opening allows the installation technician to install the burner assembly from underneath the oven. The opening is also needed if any future repairs or modifications need to be made. The opening also provides ventilation that is needed by the burner for proper operation. The base of the oven is galvanized steel, and there are four (4) holes where you need to attach the burner with the 4 included screws.
It is very important that no combustible materials be stored under the oven, as this will create a fire hazard.
The Controller:
The controller is made of heavy-duty 405 Stainless Steel and is designed so it can be installed in the front of the oven on either the left or right side. The gas line connector is a standard size 1/2″.
PDF Files For Oven Layout:
CONTACT US
53 Aero Camino
Goleta, CA 93117, USA
Info@Fornoclassico.com
WORKING HOURS
Monday – Friday: 10am - 5pm
Saturday: Closed
Sunday: Closed
Phone: (805) 895-2626
Follow Us:
Since 2000, Forno Classico has been manufacturing and designing authentic Italian brick ovens. With the ability to utilize both wood and gas, our high-performance ovens produce excellent results. Backed by years of experience, we have installed our luxury brick ovens in restaurants worldwide
Certifications
Copyright © 2025 Forno Classico LLC. All rights reserved.
